JS基本语法 介绍 ECMAScript基础语法
JavaScript的核心语法,ECMAScript描述了该语言的语法和基本对象
DOM文档对象模型
描述了处理网页内容的方法和接口
BOM浏览器对象模型
描述了与浏览器进行交互的方法和接口
使用JS 行内JS
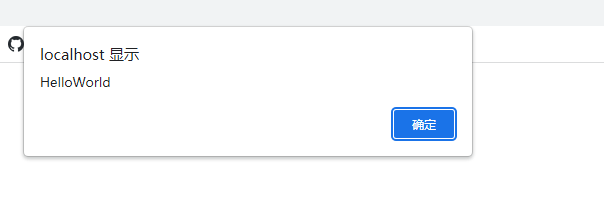
1
2
3
4
5
6
7
8
9
10
11
<!DOCTYPE html > <html > <head > <meta charset ="utf-8" /> <title > JS基础</title > </head > <body > <button type ="button" onclick ="alert('HelloWorld')" > 点我弹窗</button > </body > </html >
内部JS
将JS代码写在html页面的script标签中,推荐写在head标签后
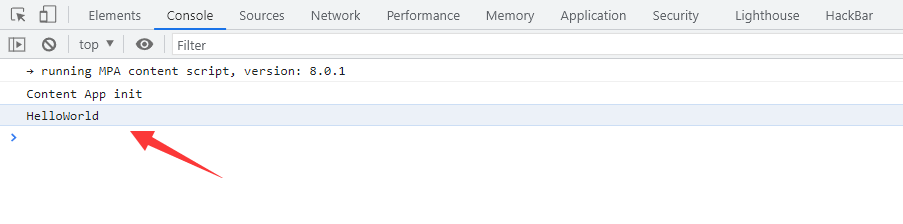
1
2
3
4
5
6
7
8
9
10
11
12
13
14
<!DOCTYPE html > <html > <head > <meta charset ="utf-8" /> <title > JS基础</title > </head > <body > </body > <script > alert("HelloWorld" ) </script > </html >
外部JS
创建JS文件,通过script标签引入JS文件,推荐创建一个文件夹专门用来存放js文件
在script标签中设置了src属性后,script标签中写的js代码无效
1 2 console .log("HelloWorld" );
1
2
3
4
5
6
7
8
9
10
11
12
<!DOCTYPE html > <html > <head > <meta charset ="utf-8" /> <title > JS基础</title > <script src ="js/myjs.js" > type="text/javascript" </script > </head > <body > </body > </html >
语句与注释 语句
js代码以行为单位,从上往下一行一行执行,语句以分号;为结尾,表示一个语句的结束
js是一种弱类型语言,如果没有加上分号,也可能不会报错
如果多语句写在一行,那每个语句结尾必须加上分号
注释
1 2 3 4 5 <!--在HTML中的注释--> // 在js代码中的单行注释 /* 在js代码中的多行注释 */
标识符与关键词 命名与规范
标识符就是一个名字,用来给变量个函数命名,有特定的规则和规范
标识符由大小写字母、_、$、数字、中文组成,且不能以数字开头,不能是关键词或保留字,严格区分大小写
在js中对标识符命名最好使用驼峰命名或蛇形命名,且最好是见名知意
js中的关键字
1 break、do、instanceof、typeof、case、else、new、var、catch、finally、return、void、continue、for、switch、while、default、if、throw、delete、in、try、function、this、with、debugger、false、true、null、class、enum、extends、super、export、import、impelements、let、public、yield、interface、package、static、const
规范命名标识符
1 2 3 4 5 6 7 8 var UserName = "Hello" ;var userName = "Hello" ;var user_name = "Hello" ;
变量 语法
当变量只声明但未赋值时,变量会返回undfinded,当变量未声明就使用时,会报错
若使用var声明一个已存在的变量时,后声明的变量是无效的
若使用var声明一个已存在的变量并赋值时,则后声明的值会覆盖掉前面声明的值
1 2 3 4 5 6 7 8 9 10 var 变量名 = 值;var 变量名;变量名 = 值; var 变量1 ,变量2 ,变量3 = 值; var 变量1 =值,变量2 =值,变量3 =值;
数据类型 数据类型
数据类型
描述
Number
数值类型,包含整数和小数
String
字符类型
Boolean
布尔类型,包含true和false
Undefined
表示未定义或不存在
Null
表示空缺,空值
Object
对象
定义数据
1 2 3 4 5 6 7 8 9 10 11 12 var my_number = 10 ;var my_string = "Hello" ;var my_bool = true ;var test;var test2 = null ;console .log(typeof my_number); console .log(typeof my_string); console .log(typeof my_bool); console .log(typeof test); console .log(typeof test2);
Undefined
当声明了变量但未赋值时,这个变量的值就是undefined
调用函数时函数有形参,但未提供实参,则参数为undefined
1 2 3 4 5 6 7 8 var txt;function test (str ) console .log(str); } console .log(txt); test();
Null
使用typeof测试null返回object字符串
undefined派生自null,所以等值比较返回true,未初始化的变量与赋值为null的变量相等
1 2 3 4 5 var a;var b = null ;console .log(typeof b); console .log(a == b);
Number
所有数字(整型和浮点型)都是以64位浮点类型存储的,1与1.0是相等的,所以尽量不要使用浮点类型做判断
在存储数值类型的数据时,会自动将浮点型数值转换为整型
1 2 3 4 5 6 var a = 1.0 ;var b = 1.5 ;console .log(1 == 1.0 ); console .log(a); console .log(b);
String
1 2 3 4 5 var a = "Hello" ;var b = 'Hello' ;console .log(a); console .log(b);
类型转换 自动类型转换
值
字符串
数字
布尔值
undefined
“undefined”
NaN
false
null
“null”
0
false
true
“true”
1
true
false
“false”
0
false
空字符
“”
0
false
“1.5”
“1.5”
1.5
true
Infinity
“Infinity”
Infinity
true
NaN
“NaN”
NaN
false
函数转换
parseInt()将字符串转为整数,判断位置为0处的字符,如果不是有效字符则返回NaN,如果时有效字符则继续匹配,直到找到无效字符
1 2 3 4 5 console .log(parseInt ("123abc" )); console .log(parseInt ("abc123" )); console .log(parseInt ("123abc456" )); console .log(parseInt ("123.456" ));
parseFloat()将字符串转为浮点数,与上面的原理一样
1 2 3 4 5 6 console .log(parseFloat ("123abc" )); console .log(parseFloat ("abc123" )); console .log(parseFloat ("123abc456" )); console .log(parseFloat ("123.456" )); console .log(parseFloat ("123.456.789" ));
显示转换
toString()将内容转换为字符串形式,注意不能对null、undefined使用
1 2 3 4 5 var num = 3.1415926 ;num = num.toString(); console .log(typeof num); console .log(num);
toFixed()函数根据表述点后指定位数将数字转换为字符串,四舍五入,注意不能对null、undefined使用
1 2 3 4 5 6 7 8 9 10 11 var num1 = 3.1415926 ;var num2 = 3.5 ;num1 = num1.toFixed(2 ); console .log(typeof num1); console .log(num1); num2 = num2.toFixed(); console .log(typeof num2); console .log(num2);
强制类型转换
Number()方法将数据强制转换为数字类型,转换失败则返回NaN
1 2 3 4 5 6 7 8 console .log(Number (true )); console .log(Number (false )); console .log(Number ("3.14" )); console .log(Number ("3.1.4" )); console .log(Number ("314 " )); console .log(Number ("123abc" )); console .log(Number (10 ));
Boolean()方法将数据强制转为布尔类型 (将0、空字符、null、undefined转为false)
1 2 3 4 5 6 7 console .log(Boolean ("" )); console .log(Boolean ("Hello" )); console .log(Boolean (null )); console .log(Boolean (0 )); console .log(Boolean (1 )); console .log(Boolean (314 ));
String()方法将任意值强制转换为字符串,与toString()方法不同的是String()方法可以对null、undefined使用
1 2 3 4 5 6 7 console .log(String (3.14 )); console .log(String (314 )); console .log(String (true )); console .log(String (false )); console .log(String (null )); console .log(String (undefined ));
运算符 算术运算符
运算符
描述
+
加
-
减
*
乘
/
除
%
取余
++
自增
—
自减
1 2 3 4 5 6 7 8 9 10 11 12 13 console .log(1 + 1 ); console .log(6 - 1 ); console .log(2 * 3 ); console .log(6 / 3 ); console .log(7 % 2 ); var num1 = 5 ;var num2 = 5 ;num1--; num2++; console .log(num1); console .log(num2);
赋值运算符
运算符
描述
等价
=
赋值
+=
加等于 a+=1
a = a+1
-=
减等于 a-=1
a = a-1
*=
乘等于 a*=1
a = a*1
/=
除等于 a/=1
a = a/1
%=
余等于 a%=1
a = a%1
比较运算符
运算符
描述
==
等于(值)
===
全等(值和类型)
!=
不等于
>
大于
<
小于
>=
大于等于
<=
小于等于
1 2 3 4 5 console .log(1 == '1' ); console .log(1 == 1 ); console .log(1 === '1' ); console .log(1 === 1 );
逻辑运算符
运算符
描述
&&
and 与
(两个管道符)
or 或
!
not 非
1 2 3 console .log(true && false ); console .log(true || false ); console .log(!true );
三目运算符
1 2 3 console .log(3 >2 ?3 :5 ); console .log(1 >2 ?3 :5 );
控制语句 if语句
1 2 3 4 5 6 7 8 9 10 11 12 13 14 15 16 17 18 19 20 21 22 23 if (条件){ 条件成立执行的代码块; } if (条件){ 条件成立执行的代码块; } else { 条件不成立执行的代码块; } if (条件){ 条件成立执行的代码块; } else if (条件){ 条件成立执行的代码块; } else if (条件){ 条件成立执行的代码块; }
switch语句
1 2 3 4 5 6 7 8 9 10 11 switch (表达式){ case 值1 : 条件成立执行的代码块; break ; case 值1 : 条件成立执行的代码块; break ; default : 所有条件不成立执行的代码块; break ; }
While循环
当条件成立时执行循环体的代码块,直到条件不成立退出循环
do…while循环
先执行一次循环体的代码块,再进行条件的判断,当条件成立时执行循环体的代码块,直到条件不成立退出循环
1 2 3 do { 循环体; }while (条件语句);
for循环 1 2 3 for (初始化语句;判断条件语句;控制条件语句){ 循环体; }
跳出循环 数组 定义数组 语法
数组索引从0开始
数组长度可变
数组中的数据可以是任意类型
1 2 3 var 数组名 = [值, 值, 值]; var 数组名 = new Array (值, 值, 值) var 数组名 = new Array (大小)
代码示例
1 2 3 4 5 6 7 8 9 var arr1 = [1 , 2 , 3 ];console .log(arr1); console .log(arr1[1 ]); var arr2 = new Array ();console .log(arr2); var arr3 = new Array (5 );console .log(arr3)
基本操作 语法
数组没有越界的概念,如果访问超出范围或元素未赋值,则返回undefined
1 2 3 4 5 数组名.length 数组名.length = 值 数组名[索引] 数组名[索引] = 值
代码示例
1 2 3 4 5 6 7 8 9 var arr1 = [1 , 2 , 3 ];console .log("数组长度 " + arr1.length); arr1.length = 5 ; console .log("数组长度 " + arr1.length); console .log(arr1[4 ]); console .log(arr1[1 ]); arr1[1 ] = 0 ; console .log(arr1[1 ]);
数组遍历 普通for遍历
1 2 3 4 for (var i=0 ;i<数组名.length;i++){ console .log(数组名[i]); }
1 2 3 4 5 var arr2 = ['Java' , 'Python' , 'C' ];for (var i=0 ;i<arr2.length;i++){ console .log(arr2[i]); }
for..in遍历
1 2 3 4 for (var i in 数组名){ console .log(数组名[i]); }
1 2 3 4 5 var arr2 = ['Java' , 'Python' , 'C' ];for (var i in arr2){ console .log(arr2[i]); }
forEach遍历
1 2 3 4 5 数组名.forEach(function (值, 索引 ) console .log(值); console .log(索引); })
1 2 3 4 5 var arr2 = ['Java' , 'Python' , 'C' ];arr2.forEach(function (element, index ) console .log(element); })
数组方法 数组方法
方法
描述
push
添加元素到最后
unshift
添加元素到最前
pop
删除最后一个元素
shift
删除第一个元素
reverse
数组翻转
join
数组翻转成字符串(原数组不变)
indexof
数组元素索引
slice
数组切片(原数组不变)
splice
数组切片(原数组改变)
concat
数组合并
添加删除元素 1 2 3 4 5 6 7 8 9 10 11 12 13 14 15 16 17 18 var arr1 = ['Java' , 'Python' , 'C' ];arr1.push("C#" ); console .log(arr1); arr1.unshift("PHP" ); console .log(arr1); arr1.pop(); console .log(arr1); arr1.shift(); console .log(arr1);
数组翻转 1 2 3 4 5 6 7 8 9 10 11 12 13 var arr1 = [1 , 2 , 3 ];arr1.reverse(); console .log(arr1); var str1 = arr1.join();console .log(str1); var str2 = arr1.join('-' );console .log(str2);
元素索引
在数组中搜索不到指定元素时,返回-1
数组中如果存在多个相同元素时,返回第一个元素的索引
1 2 3 4 5 6 7 8 9 10 var arr1 = [1 , 2 , 3 , 3 , 2 , 1 ];var index1 = arr1.indexOf('a' );console .log(index1); var index2 = arr1.indexOf(1 );console .log(index2); var index3 = arr1.indexOf(3 );console .log(index3);
数组切片
1 2 3 4 5 6 7 8 9 10 11 12 var arr1 = [1 , 2 , 3 , 4 , 5 , 6 ];var arr2 = arr1.slice(1 ,3 ); console .log(arr2); var arr3 = arr1.slice(-1 ); console .log(arr3); var arr4 = arr1.slice(-2 ); console .log(arr4); console .log(arr1);
1 2 3 4 5 var arr1 = [1 , 2 , 3 , 4 , 5 , 6 ];var arr2 = arr1.splice(1 ,3 ); console .log(arr2); console .log(arr1);
数组合并 1 2 var 新数组 = 数组1. concat(数组2 );
1 2 3 4 5 6 7 8 9 10 var arr1 = [1 , 2 , 3 ];var arr2 = [4 , 5 , 6 ];var arr3 = arr1.concat(arr2);console .log(arr3); var arr4 = arr2.concat(arr1);console .log(arr4);
函数 函数定义
函数有三种定义方法: 函数声明语句、函数定义表达式、Function构造函数
JS中方法没有重载,如果出现同名则会覆盖
函数声明语句
1 2 3 4 5 6 function 函数名(形参1 , 形参2 ) 函数代码块; } 函数名(实参1 , 实参2 );
1 2 3 4 5 6 7 函数名(实参1 , 实参2 ); function 函数名(形参1 , 形参2 ) 函数代码块; }
1 2 3 4 5 6 7 8 9 10 11 function test ( console .log("HelloWorld" ); } function test2 (name ) console .log("Hello" + name); } test(); test2("Jack" );
函数定义表达式
该方法将一个匿名函数赋值给变量,这个匿名函数又称函数表达式
1 2 3 4 5 var 变量名 = function (形参1 , 形参2 ) 函数代码块; } 变量名(实参1 , 实参2 );
1 2 3 4 5 6 var test = function ( console .log("HelloWorld" ); } test();
Function构造函数
1 2 3 4 5 6 var 函数名 = new Function (形参1 , 形参2 , 函数代码块);function 函数名(形参1 , 形参2 ) 函数代码块; }
1 2 3 4 5 6 7 var test = new Function ('console.log("HelloWorld")' )test(); var test2 = new Function ('a' , 'b' , 'return a+b' )var result = test2(1 , 2 );console .log(result);
传递参数
如果函数定义了形参,但调用函数时没有传递实参,则对应的形参值为undefined
传递参数
1 2 3 4 5 6 function test (x, y ) console .log(x+y); } test(); test(1 ,2 );
指定形参默认值
1 2 3 4 function 函数名(形参1 ) 形参1 = 形参1 || 默认值 }
1 2 3 4 5 6 7 8 function test (x ) x = x || 'Hello' console .log(x); } var txt1 = test(); var txt1 = test('Hi' );
返回值
函数没有返回值时,返回undefined
如果函数不需要返回值,使用return时表示结束
1 2 3 4 5 6 7 8 function test (x, y ) return x + y; console .log('Hello' ); } test(1 , 2 ); var txt1 = test(1 , 2 ); console .log(txt1);
函数作用域
在js中只有函数才有作用域
在函数中定义变量时,如果没有加var关键词,则表示该变量为全局变量
1 2 3 4 5 6 function test ( a = "Hello" ; } test() console .log(a);
全局变量与局部变量同名时,局部变量与全局变量是没有关联的,局部变量相当于新声明的变量
1 2 3 4 5 6 7 8 9 10 var a = 10 ; var b = "Hello" ;function test ( var a = 100 ; console .log(a); console .log(b); } test(); console .log(a);
内置对象 字符串对象
方法
描述
charAt(索引)
返回指定位置处的字符串
indexOf(字符串)
返回指定指定子字符串的位置,找不到返回-1
substr(m,n)
从m位置开始,截取n个字符并返回
substring(m,n)
返回从m位置开始,到n位置结束的字符
toLowerCase()
将字符串中的字符全部转为小写
toUpperCase()
将字符串中的字符全部转为大写
length
返回字符串长度
1 2 3 4 5 6 7 8 9 10 11 12 13 14 15 16 var str1 = "abcdefg" ;var str2 = "ABCdEFg" ;console .log(str1.charAt(2 )); console .log(str1.indexOf("c" )); console .log(str1.substr(0 ,3 )); console .log(str1.substr(3 )); console .log(str1.substring(0 ,3 )); console .log(str1.substring(3 )); console .log(str2.toLowerCase()); console .log(str2.toUpperCase()); console .log(str1.length);
数学对象
方法
描述
Math.random()
随机数
Math.ceil()
向上取整,大于最大整数
Math.floor()
向下取整,小于最小整数
1
2
3
4
5
console .log(Math .random()); var num1 = 1.00001 ;console .log(Math .ceil(num1)); console .log(Math .floor(num1));
日期对象 获取日期
对象
描述
getFullYear()
年
getMonth()
月(0~11)
getDate()
日
getHours()
时
getMinutes()
分
getSeconds()
秒
1 2 3 4 5 6 7 8 var date = new Date ();console .log(date.getFullYear()); console .log(date.getMonth()+1 ); console .log(date.getDate()); console .log(date.getHours()); console .log(date.getMinutes()); console .log(date.getSeconds());
对象
JS中的对象键都是字符串,值可以为字符串、数字、数组、布尔值、函数
JS创建自定义对象主要通过三种方法: 字面量形式创建对象、通过new Ojbect对象创建、通过Object对象的create方法创建对象
创建对象 字面量形式创建(常用)
1 2 3 4 5 6 var 对象名 = {};var 对象名 = {键:值,键:值};对象名.键
1 2 3 4 5 6 7 8 9 10 11 12 13 14 15 16 17 18 19 20 21 22 23 24 var obj = { 'name' : 'Jack' , age : 18 , test : function test ( console .log('Hello test' ); }, courses : { java : 6 , python : 10 }, flag : true , users : [ {name : '张三' , age : 20 }, {name : '李四' , age : 30 }, {name : '王五' } ] }; console .log(obj.name); obj.test(); console .log(obj.courses.java); console .log(obj.users[0 ].name);
new Object创建
1 2 3 4 5 6 var obj = new Object ();obj.user = "Jack" ; obj.pass = "1234" ; console .log(obj); console .log(obj.user);
通过Object对象的create方法创建
1 2 var 对象名 = Object .create(null ); var 对象名 = Object .create(对象);
1 2 3 4 5 6 7 8 var obj = Object .create(null );obj.user = "Jack" ; obj.pass = "1234" ; console .log(obj); console .log(obj.user); var obj2 = Object .create(obj);console .log(obj2.user);
添加数据
1 2 3 4 5 6 7 var obj = {'user' :'guest' };obj.user = 'admin' ; obj.pass = '123' ; console .log(obj);
序列化与反序列化
序列化将JS对象序列化为字符串,反序列化将字符串反序列化为JS对象
JS通过调用JSON方法,可以将对象序列化或字符串反序列化
1 2 3 4 5 JSON .stringify(对象);JSON .parse(json字符);
1 2 3 4 5 6 7 8 9 10 11 12 var obj1 = {'user' :'admin' }; var str1 = '{"user":"admin"}' ; console .log(typeof obj1); console .log(typeof str1); var str2 = JSON .stringify(obj1); console .log(typeof str2); console .log(str2);var obj2 = JSON .parse(str1); console .log(typeof obj2);
this
在函数中this表示该方法所属的对象(全局对象)。若单独使用则表示全局对象
谁调用函数,则this就指向谁
1 2 3 4 5 6 7 8 9 var obj = { name : "张三" , age : 18 , test : function test ( console .log(this .name + "今年" + this .age + "岁" ); } } obj.test();
JS事件 介绍 介绍
事件是JS应用的心脏,它与HTML元素进行交互
当HTML中使用JS时,JS可以通过某操作触发事件,如鼠标经过,鼠标点击等
作用
可以用于验证用户输入的数据
增强页面动态效果等
事件中的名词
事件源 : 谁触发的事件事件名 : 触发了什么事件事件监听 : 谁管这个事情,谁监视事件处理 : 发生后怎么处理
1 2 3 闯红灯 事件源: 汽车 事件名: 闯红灯 事件监听: 摄像头、交警 事件处理: 罚款扣分
事件类型 常用事件
事件
描述
onload
当页面或图片加载完成后触发
onblur
元素失去焦点触发
onfocus
元素获得焦点触发
onclick
鼠标点击触发
onchange
用户改变域内容触发
onmouseover
鼠标移动到元素上触发
onmouseout
鼠标离开元素后触发
onkeyup
某键盘按键松开触发
onkeydown
某键盘按键按下触发
事件流
事件流指的是页面接受事件的顺序,它有事件冒泡、事件捕获
事件冒泡
IE的事件流叫做事件冒泡,即事件开始时由最具体的元素接受,然后逐级向上传播到较为不具体的节点
如果点击了div元素后,则click单击事件的执行顺序为div —> body —> html —> 文档
1 2 3 4 5 6 7 8 9 10 11 <!DOCTYPE html > <html > <head > <meta charset ="utf-8" /> <title > JS事件冒泡</title > </head > <body onload ="test()" > <div id ="myDiv" > 点我</div > </body > </html >
事件捕获
事件捕获是从较为不具体的节点逐级向上传播到最具体的元素,与事件冒泡相反
如果点击了div元素后,则click单击事件的执行顺序为文档 —> html —> body —> div
1 2 3 4 5 6 7 8 9 10 11 <!DOCTYPE html > <html > <head > <meta charset ="utf-8" /> <title > JS事件冒泡</title > </head > <body onload ="test()" > <div id ="myDiv" > 点我</div > </body > </html >
事件处理程序 HTML事件处理程序
某个元素支持的每种事件,都可以用一个相应的事件处理程序同名的HTML特征来指定
1 2 <元素名 事件类型="处理函数或方法"></元素名>
1 2 3 4 5 6 7 8 9 10 <body > <button type ="button" onclick ="alert('Hello')" > 点我弹窗</button > <button type ="button" onclick ="test()" > 点我弹窗</button > <script > function test ( alert('Hello' ); } </script > </body >
DOM0级事件处理程序
通过JS指定事件处理程序的传统方式,就是将一个函数赋值给一个事件处理程序属性
该方法只能为同一个元素的同一个事件设定一个事件程序
注意: 处理程序要放在触发元素之后,因为代码是从上往下执行的,如果放在前面会找不到需要绑定的元素
1 2 3 4 5 6 7 8 9 10 11 12 <body > </body > <button id ="myBtn" > 点我</button > <script > var btn = document .getElementById('myBtn' ); btn.onclick = function ( alert('Hello' ); } </script > </body >
DOM2级事件处理程序
DOM2级事件定义了两个方法: addEventListener()指定处理程序、removeEventListener()删除事件处理程序
两个方法都接受三个参数: 要处理的事件名、事件处理程序的函数和一个布尔值
最后的布尔值如果为true则表示在捕获阶段调用事件处理程序,反之则表示在冒泡阶段处理程序(一般不用去管该参数,浏览器会自己处理)
1 2 3 4 5 6 7 var 变量名 = document .getElementById('元素ID' ); btn.addEventListener('事件类型' ,处理函数) 变量名.removeEventListener('事件类型' , 函数名)
1 2 3 4 5 6 7 8 9 <body > <button id ="myBtn" > 点我</button > <script > var btn = document .getElementById('myBtn' ); btn.addEventListener('click' ,function ( alert('Hello' ); }) </script > </body >
常用事件示例 1 2 3 4 5 6 7 8 9 10 11 12 13 14 15 16 17 18 19 20 21 22 23 24 25 26 27 28 29 30 31 32 33 34 35 36 37 38 39 40 41 42 43 44 45 46 47 48 49 50 51 52 53 54 55 56 57 58 59 60 61 62 63 <!DOCTYPE html > <html > <head > <meta charset ="utf-8" /> <title > JS事件</title > </head > <body > <input type ="text" id ="user" > <br > <input type ="button" id ="btn1" value ="点我" > <br > <select name ="" id ="city" > <option value ="" > 选择城市</option > <option value ="xiamen" > 厦门</option > <option value ="zhangzhou" > 漳州</option > <option value ="quanzhou" > 泉州</option > </select > <p id ="mouse" > --鼠标放上来或离开--</p > <script > window .onload = function ( console .log("页面加载完成..." ); } var user_input = document .getElementById('user' ); user_input.onblur = function ( console .log('文本框失去焦点' ); } user_input.onfocus = function ( console .log('文本框获得焦点' ); } user_input.onkeydown = function ( console .log("键盘按键被按下" ); } user_input.onkeyup = function ( console .log("键盘按键被松开" ); } document .getElementById('btn1' ).onclick = function ( console .log("按钮被点击" ); } var city = document .getElementById('city' ); city.onchange = function ( console .log("下拉框值改变了" ); } var mouse = document .getElementById('mouse' ); mouse.onmouseover = function ( console .log('鼠标悬停在元素上' ); } mouse.onmouseout = function ( console .log('鼠标离开元素' ); } </script > </body > </html >
JS-BOM对象 Window对象方法 系统对话框
方法
描述
alert
消息框
prompt
输入框
confirm
确认框
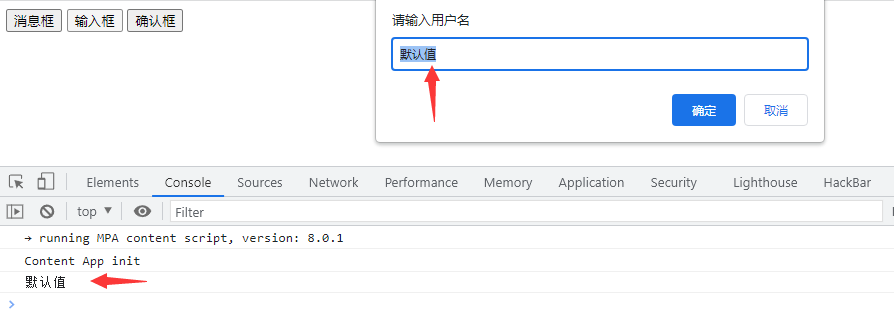
1 2 3 4 5 6 7 8 9 10 11 12 13 14 15 16 17 18 19 20 21 22 <body > <button type ="button" onclick ="alert('消息框')" > 消息框</button > <button type ="button" onclick ="test_prompt()" > 输入框</button > <button type ="button" onclick ="test_confirm()" > 确认框</button > <script > function test_prompt ( var str1 = prompt("请输入用户名" ,"默认值" ); console .log(str1); } function test_confirm ( var flag = confirm("是否删除文件?" ) console .log(flag); if (flag){ console .log("删除成功" ); } } </script > </body >
开/关窗口
方法
描述
window.open
打开窗口
window.close
关闭窗口
1 2 3 4 5 window .open('打开的地址' ,'打开方式' );window .close();
1 2 3 4 5 6 7 8 9 10 11 12 13 14 15 16 17 <body > <button type ="button" onclick ="open_baidu_1()" > 新窗口打开百度</button > <button type ="button" onclick ="open_baidu_2()" > 此窗口打开百度</button > <script > function open_baidu_1 ( window .open('https://www.baidu.com' ,'_blank' ); } function open_baidu_2 ( window .open('https://www.baidu.com' ,'_self' ); } </script > </body >
时间函数
方法
描述
setTimeout(函数,毫秒)
设置延时
clearTimeout()
清除延时
setInteval(函数,毫秒)
指定时间循环执行函数
1 2 3 4 5 6 7 8 9 10 11 12 13 14 15 16 17 18 19 20 21 22 23 24 25 26 27 28 29 30 31 32 33 34 <body > <button type ="button" onclick ="test()" > 点我3秒后跳转百度</button > <br > <button type ="button" onclick ="init()" > 查看时间</button > <button type ="button" onclick ="clear_timeout()" > 停止查看</button > <h2 id ="show_time" > </h2 > <script > function toBaidu ( window .open('https://www.baidu.com' ,'_blank' ); } function test ( console .log("3秒后跳转..." ); var a = setTimeout (toBaidu, 3000 ); } var time_id; function init ( var times = new Date ().toLocaleTimeString(); document .getElementById('show_time' ).innerHTML = times; time_id = setTimeout (init, 1000 ); } function clear_timeout ( clearTimeout (time_id); } </script > </body >
1 2 3 4 5 6 7 8 9 10 11 12 13 14 15 16 17 18 19 20 21 22 23 24 25 26 27 28 29 30 31 <body > <button type ="button" onclick ="show_time()" > 查看时间</button > <button type ="button" onclick ="clear_timeout()" > 停止查看</button > <h2 id ="show_time" > </h2 > <script > var time_id; function init ( var times = new Date ().toLocaleTimeString(); document .getElementById('show_time' ).innerHTML = times; } function show_time ( time_id = setInterval (init, 1000 ); } function clear_timeout ( clearTimeout (time_id); } </script > </body >
histoty对象 histoty对象的方法
方法
描述
back()
加载历史记录列表的上一个URL
forward()
加载历史记录列表的下一个URL
go(历史位置,URL)
加载历史记录列表的指定URL
代码示例
先访问页面1,然后点击去到页面2,这时候浏览记录就创建了
再点击页面2的后退,就可以回到页面1,点击页面1的前进可以回到页面2
1 2 3 4 5 6 7 8 9 10 11 <body > <p > 页面1</p > <a href ="2.html" > 去到页面2</a > <br > <button type ="button" onclick ="window.history.forward()" > 前进</button > <button type ="button" onclick ="window.history.back()" > 后退</button > <script > console .log(window .history.length) </script > </body >
1 2 3 4 5 6 7 8 9 10 <body > <p > 页面2</p > <button type ="button" onclick ="window.history.forward()" > 前进</button > <button type ="button" onclick ="window.history.back()" > 后退</button > <script > console .log(window .history.length); </script > </body >
localtion对象 localtion对象方法
方法属性
描述
href
设置
reload()
重新加载当前页面
replace()
用新的页面替换当前页面
代码示例
1 2 3 4 5 6 7 8 9 10 11 12 13 14 15 16 17 18 19 20 21 <body > <button type ="button" onclick ="open_baidu()" > 访问百度</button > <br > <button type ="button" onclick ="open_baidu_2()" > 替换页面</button > <br > <button type ="button" onclick ="window.location.reload()" > 刷新页面</button > <br > <script > console .log(window .location.href); function open_baidu ( window .location.href = "https://www.baidu.com" ; } function open_baidu_2 ( window .location.replace("https://www.baidu.com" ); } </script > </body >
JS-DOM对象 节点
加载HTML页面时,浏览器会生成一个树型结构,用来表示页面的内部结构
节点类型
描述
举例
文档节点
文档本身
整个文档
元素节点
所有的html元素
a、p、div
属性节点
html元素内的属性
id、href、name
文本节点
元素内的文本
Hello
注释节点
html中的注释
<!--xx-->
获取节点 获取节点
对元素进行增删改时,都要指定到一个位置,这时候就可以通过下面的方法来获取到这个位置
获取到数组时可以使用[索引]来获取指定元素
方法
描述
getElementById()
根据id获取DOM对象 (取第一个)
getElementsByTagName()
根据标签获取DOM对象数组
getElementsByClassName()
根据class名获取对象数组
getElementsByName()
根据name属性获取DOM对象数组
1 2 3 4 5 6 window .onload = function ( 整个页面加载完成后执行的代码; }
代码示例
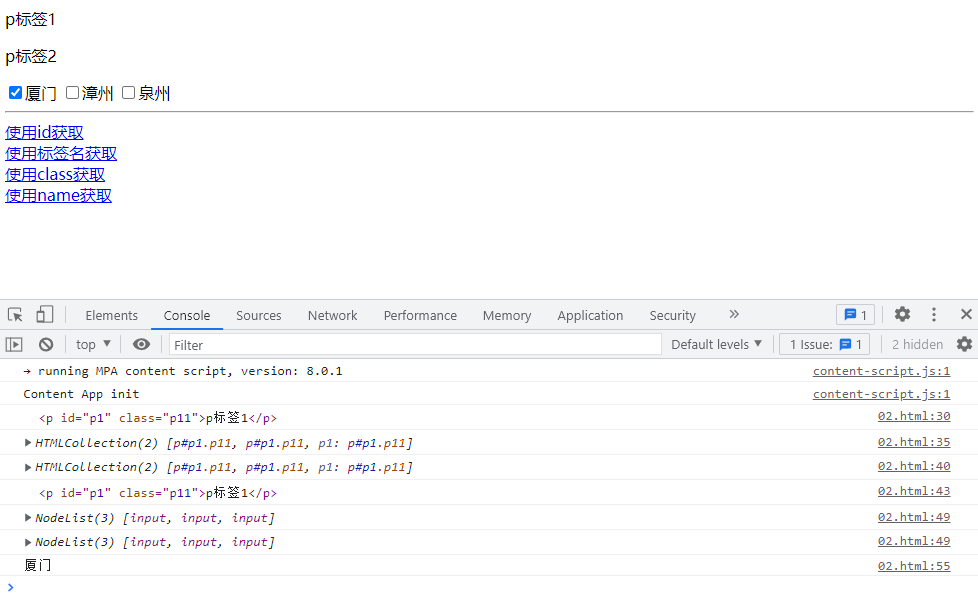
1 2 3 4 5 6 7 8 9 10 11 12 13 14 15 16 17 18 19 20 21 22 23 24 25 26 27 28 29 30 31 32 33 34 35 36 37 38 39 40 41 42 43 44 45 46 47 48 49 50 51 <body > <p id ="p1" class ="p11" > p标签1</p > <p id ="p1" class ="p11" > p标签2</p > <input type ="checkbox" name ="city" value ="厦门" > 厦门 <input type ="checkbox" name ="city" value ="漳州" > 漳州 <input type ="checkbox" name ="city" value ="泉州" > 泉州 <hr > <a href ="javascript:void(0)" onclick ="test_id()" > 使用id获取</a > <br > <a href ="javascript:void(0)" onclick ="test_tag()" > 使用标签名获取</a > <br > <a href ="javascript:void(0)" onclick ="test_class()" > 使用class获取</a > <br > <a href ="javascript:void(0)" onclick ="test_name()" > 使用name获取</a > <br > </body > <script > function test_id ( console .log(document .getElementById('p1' )); } function test_tag ( console .log(document .getElementsByTagName('p' )); } function test_class ( console .log(document .getElementsByClassName('p11' )); console .log(document .getElementsByClassName('p11' )[0 ]); } function test_name ( var city = document .getElementsByName('city' ); console .log(city); for (i=0 ;i<city.length;i++){ if (city[i].checked){ console .log(city[i].value); } } } </script >
创建插入节点 创建节点
方法
描述
createElement()
创建新节点
createTextNode()
创建一个文本节点
innerHTML
在指定位置创建节点
插入节点
方法
描述
write()
将任意字符串插入到文档中
appendChild()
向元素中添加新子节点,作为最后一个子节点
insertBefore()
向指定节点之上插入新节点
代码示例 添加标签
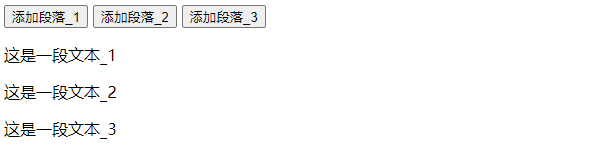
1 2 3 4 5 6 7 8 9 10 11 12 13 14 15 16 17 18 19 20 21 22 23 24 25 26 27 28 29 30 31 32 33 34 35 36 37 38 39 40 41 42 43 44 45 46 47 48 <body > <button type ="button" onclick ="add_para_1()" > 添加段落_1</button > <button type ="button" onclick ="add_para_2()" > 添加段落_2</button > <button type ="button" onclick ="add_para_3()" > 添加段落_3</button > <div id ="div1" > </div > </body > <script > function add_para_1 ( var p = document .createElement("p" ); var txt = document .createTextNode("这是一段文本_1" ); p.appendChild(txt); var div = document .getElementById('div1' ); div.appendChild(p); } function add_para_2 ( var p = document .createElement("p" ); p.innerHTML = "这是一段文本_2" ; document .getElementById('div1' ).appendChild(p); } function add_para_3 ( var p = "<p>这是一段文本_3</p>" ; document .getElementById('div1' ).innerHTML += p; } </script >
添加图片
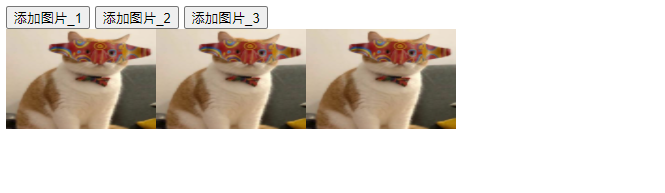
1 2 3 4 5 6 7 8 9 10 11 12 13 14 15 16 17 18 19 20 21 22 23 24 25 26 27 28 29 30 31 32 33 34 35 36 37 38 39 40 41 42 43 44 45 46 47 48 49 50 51 52 53 54 55 56 57 <body > <button type ="button" onclick ="add_img_1()" > 添加图片_1</button > <button type ="button" onclick ="add_img_2()" > 添加图片_2</button > <button type ="button" onclick ="add_img_3()" > 添加图片_3</button > <div id ="div1" > </div > </body > <script > function add_img_1 ( var div = document .getElementById('div1' ); var img = document .createElement('img' ); img.src = "src/1.jpg" ; img.width = 150 ; img.height = 100 ; div.appendChild(img) } function add_img_2 ( var div = document .getElementById('div1' ); var img = document .createElement('img' ); img.setAttribute("src" , "src/1.jpg" ); img.setAttribute("width" , "150" ); img.setAttribute("height" , "100" ); div.appendChild(img); } function add_img_3 ( var div = document .getElementById('div1' ); var img = '<img src="src/1.jpg" width="150" height="100">' ; div.innerHTML += img; } </script >
下拉框
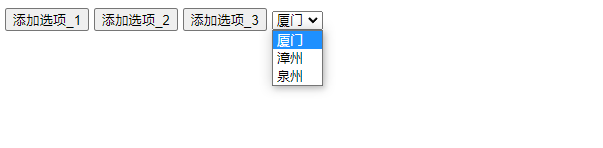
1 2 3 4 5 6 7 8 9 10 11 12 13 14 15 16 17 18 19 20 21 22 23 24 25 26 27 28 29 30 31 32 33 34 35 36 <body > <button type ="button" onclick ="add_option_1()" > 添加选项_1</button > <button type ="button" onclick ="add_option_2()" > 添加选项_2</button > <button type ="button" onclick ="add_option_3()" > 添加选项_3</button > <select name ="city" id ="city" > </select > </body > <script > function add_option_1 ( var sel = document .getElementById('city' ); var opt = document .createElement('option' ); opt.value="厦门" ; opt.innerText = "厦门" ; sel.appendChild(opt); } function add_option_2 ( var sel = document .getElementById('city' ); var opt = document .createElement('option' ); opt.value = "漳州" ; opt.innerText = "漳州" ; sel.options.add(opt); } function add_option_3 ( var opt = '<option value="泉州">泉州</option>' ; document .getElementById('city' ).innerHTML += opt; } </script >
write()方法
1 2 3 4 5 6 7 8 <body > <button type ="button" onclick ="add_h2()" > 添加h2标签</button > </body > <script > function add_h2 ( document .write("<h2>Hello</h2>" ); } </script >
insertBefore()方法
1 2 3 4 5 6 7 8 9 10 11 12 13 14 15 16 <body > <button type ="button" onclick ="add_li()" > 在红色前面添加</button > <ul > <li id ="red" > 红色</li > <li id ="blue" > 蓝色</li > </ul > </body > <script > function add_li ( var li = document .createElement('li' ); li.id = "pink" ; li.innerHTML = "粉色" ; document .getElementById('red' ).parentElement.insertBefore(li, document .getElementById('red' )); } </script >
间接查找节点 常用方法与属性
方法属性
描述
childNodes
返回元素的第一个子节点的数组
firstChild
返回元素的第一个子节点
lastChild
返回元素的最后一个子节点
nextSibling
返回元素的下一个兄弟节点
parentNode
返回元素的父节点
previousSibling
返回元素的上一个兄弟节点
代码示例
1 2 3 4 5 6 7 8 9 10 11 12 13 14 15 16 17 18 19 20 21 22 23 24 25 26 <body > <button type ="button" onclick ="add_li()" > 在红色前面添加</button > <ul > <li id ="red" > 红色</li > <li id ="blue" > 蓝色</li > </ul > </body > <script > function add_li ( var ul = document .getElementsByTagName('ul' )[0 ]; console .log(ul.childNodes); console .log(ul.children); console .log(ul.firstChild); console .log(ul.firstElementChild); console .log(ul.lastChild); console .log(ul.lastElementChild); } </script >
删除节点
方法
描述
removeChild()
从元素中删除子元素
1 2 3 4 5 6 7 8 9 10 11 12 13 14 15 16 17 <body > <button type ="button" onclick ="del_li()" > 在红色前面添加</button > <ul > <li id ="red" > 红色</li > <li id ="blue" > 蓝色</li > </ul > </body > <script > function del_li ( var li = document .getElementById("red" ); li.parentElement.removeChild(li); } </script >
JS表单 获取表单 常用方法
1 2 3 4 5 6 7 8 document .表单名称document .getElementById(表单ID);document .forms[表单名称];document .forms[索引];
代码示例
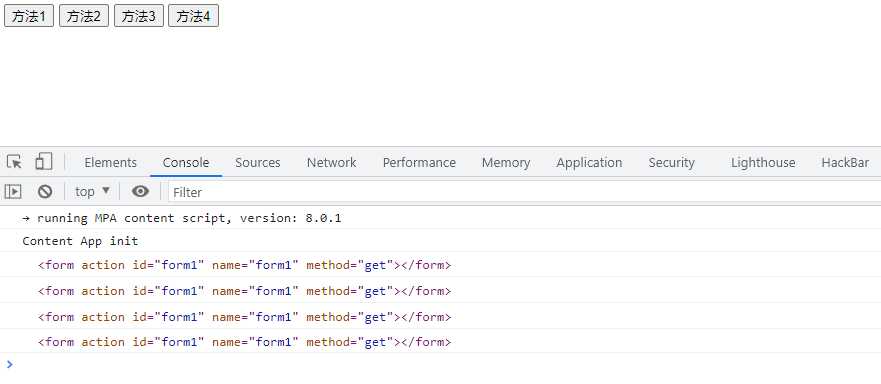
1 2 3 4 5 6 7 8 9 10 11 12 13 14 15 16 17 18 19 20 21 22 23 24 25 26 27 28 29 30 31 32 33 34 35 <body > <form action ="" id ="form1" name ="form1" method ="get" > </form > <form action ="" id ="form2" name ="form2" method ="get" > </form > <button type ="button" onclick ="get_form_1()" > 方法1</button > <button type ="button" onclick ="get_form_2()" > 方法2</button > <button type ="button" onclick ="get_form_3()" > 方法3</button > <button type ="button" onclick ="get_form_4()" > 方法4</button > </body > <script > function get_form_1 ( var form = document .form1; console .log(form); } function get_form_2 ( var form = document .getElementById('form1' ); console .log(form); } function get_form_3 ( var form = document .forms['form1' ]; console .log(form); } function get_form_4 ( var form = document .forms[0 ]; console .log(form); } </script >
获取表单元素
获取元素的方法不止下面示例的,下面只是一些常用的方法
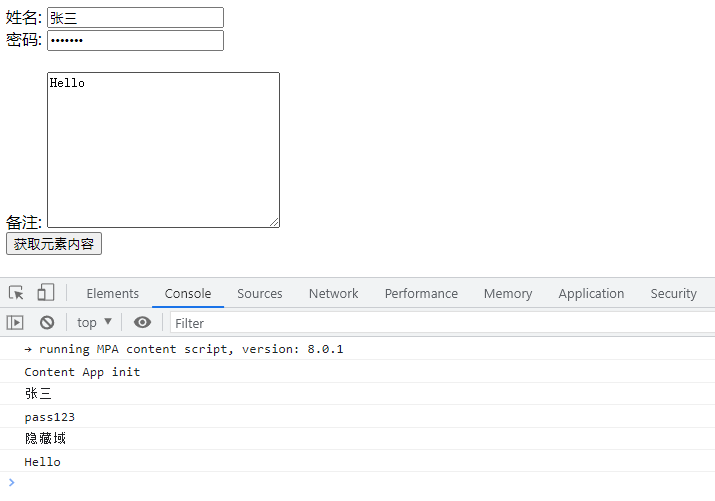
1 2 3 4 5 6 7 8 9 10 11 12 13 14 15 16 17 18 19 20 21 22 23 24 25 26 27 28 29 <body > <form action ="" id ="form1" name ="form1" method ="get" > 姓名: <input type ="text" id ="uname" name ="uname" value ="张三" > <br > 密码: <input type ="password" id ="upass" name ="upass" value ="pass123" > <br > <input type ="hidden" id ="uno" name ="uno" value ="隐藏域" > <br > 备注: <textarea name ="remarks" id ="remarks" cols ="30" rows ="10" > </textarea > <br > <button type ="button" onclick ="get_txt()" > 获取元素内容</button > </form > </body > <script > function get_txt ( var uname = document .getElementById('uname' ); console .log(uname.value); var upass = document .getElementById('form1' ).upass; console .log(upass.value); var uno = document .getElementsByName('uno' )[0 ]; console .log(uno.value); var remarks = document .getElementsByTagName('textarea' )[0 ]; console .log(remarks.value); } </script >
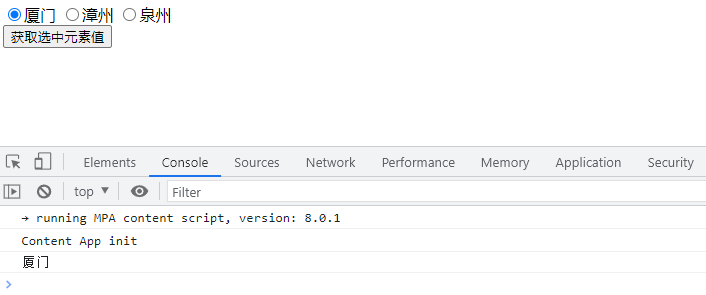
获取单选按钮 1 2 3 4 5 6 7 8 9 10 11 12 13 14 15 16 17 18 19 20 21 22 <body > <form action ="" id ="form1" name ="form1" method ="get" > <input type ="radio" name ="city" value ="厦门" > 厦门 <input type ="radio" name ="city" value ="漳州" > 漳州 <input type ="radio" name ="city" value ="泉州" > 泉州<br > <button type ="button" onclick ="get_txt()" > 获取选中元素值</button > </form > </body > <script > function get_txt ( var city = document .getElementsByName('city' ); for (var i=0 ; i<city.length; i++){ if (city[i].checked){ console .log(city[i].value); } } } </script >
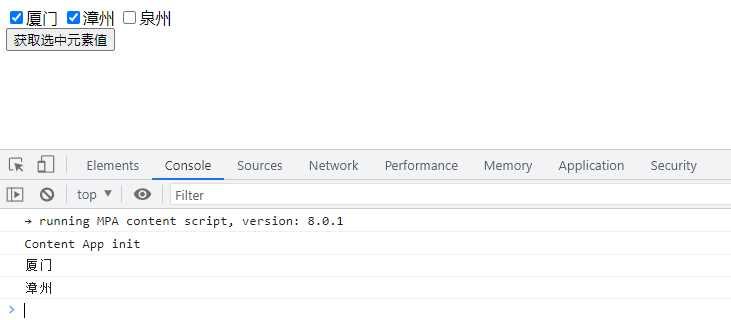
获取多选按钮 与获取单选按钮方法一样
1 2 3 4 5 6 7 8 9 10 11 12 13 14 15 16 17 18 19 20 21 22 <body > <form action ="" id ="form1" name ="form1" method ="get" > <input type ="checkbox" name ="city" value ="厦门" > 厦门 <input type ="checkbox" name ="city" value ="漳州" > 漳州 <input type ="checkbox" name ="city" value ="泉州" > 泉州<br > <button type ="button" onclick ="get_txt()" > 获取选中元素值</button > </form > </body > <script > function get_txt ( var city = document .getElementsByName('city' ); for (var i=0 ; i<city.length; i++){ if (city[i].checked){ console .log(city[i].value); } } } </script >
获取下拉选项 1 2 3 4 5 6 7 8 9 10 11 12 13 14 15 16 17 18 19 20 21 22 23 24 25 26 27 28 29 30 31 32 33 34 35 36 37 38 39 40 <body > <form action ="" id ="form1" name ="form1" method ="get" > <select name ="city" id ="city" > <option value ="厦门" > 厦门</option > <option value ="漳州" > 漳州</option > <option value ="泉州" > 泉州</option > </select > <br > <button type ="button" onclick ="get_txt()" > 获取选中元素值</button > <button type ="button" onclick ="get_txt_2()" > 获取选中元素值_2</button > </form > </body > <script > function get_txt ( var city = document .getElementById('city' ); var opt_index = city.selectedIndex; console .log(city.options[opt_index].value); console .log(city.options[opt_index].text); } function get_txt_2 ( var city = document .getElementById('city' ); console .log(city.value); } </script >
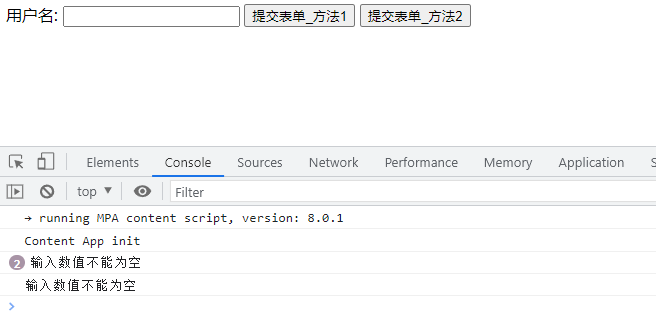
提交表单 1 2 3 4 5 6 7 8 9 10 11 12 13 14 15 16 17 18 19 20 21 22 23 24 25 26 27 28 29 30 31 32 33 34 35 <body > <form action ="" id ="form1" name ="form1" method ="get" > 用户名: <input type ="text" name ="uname" > <button type ="button" onclick ="push_data_1()" > 提交表单_方法1</button > <button type ="button" onclick ="return push_data_2()" > 提交表单_方法2</button > </form > </body > <script > function push_data_1 ( var uname = document .getElementsByName('uname' )[0 ]; if (!uname.value || uname.value.trim() == "" ){ console .log('输入数值不能为空' ); } else { document .getElementById('form1' ).submit(); } } function push_data_2 ( var uname = document .getElementsByName('uname' )[0 ]; if (!uname.value || uname.value.trim() == "" ){ console .log('输入数值不能为空' ); return false ; } return true ; } </script >
表单校验 要求
用户名长度在2~5之间,且不能为空
密码长度为6~12之间,且不能包含用户名、不能为空
性别必须选男 (没有歧视的意思!)
爱好至少选中一项
城市必须选中一项
满足以上条件就提交表单,反之打印出原因且不能提交
1 2 3 4 5 6 7 8 9 10 11 12 13 14 15 16 17 18 19 20 21 22 23 24 25 26 27 28 29 30 31 32 33 34 35 36 37 38 39 40 41 42 43 44 45 46 47 48 49 50 51 52 53 54 55 56 57 58 59 60 61 62 63 64 65 66 67 68 69 70 71 72 73 74 75 76 77 78 79 80 81 82 83 84 85 86 87 88 89 90 91 92 93 94 95 96 97 98 99 100 101 102 103 104 105 106 107 108 109 110 111 112 113 <body > <form action ="" id ="form1" name ="form1" method ="get" > 用户: <input type ="text" name ="uname" > <br > 密码: <input type ="text" name ="upass" > <br > 性别: <input type ="radio" name ="sex" value ="男" > 男 <input type ="radio" name ="sex" value ="男" > 女<br > 爱好: <input type ="checkbox" name ="ufav" value ="滑板" > 滑板 <input type ="checkbox" name ="ufav" value ="跑步" > 跑步 <input type ="checkbox" name ="ufav" value ="篮球" > 篮球<br > 城市: <select name ="city" id ="city" > <option value ="-1" > 请选择城市</option > <option value ="厦门" > 厦门</option > <option value ="漳州" > 漳州</option > <option value ="泉州" > 泉州</option > </select > <br > <br > <button type ="button" onclick ="push_data()" > 提交表单</button > <button type ="reset" onclick ="reset_data()" > 重置表单</button > </form > <h3 id ="error_msg" > </h3 > </body > <script > function id_get_dom (id ) return document .getElementById(id); } function name_get_dom (name ) return document .getElementsByName(name); } function is_empty (str ) if (str == null || str.trim() == "" ){ return true ; } return false ; } function reset_data ( id_get_dom('form1' ).reset(); } function push_data ( var uname = name_get_dom('uname' )[0 ].value; if (is_empty(uname)){ id_get_dom('error_msg' ).innerHTML = "用户名不能为空" ; return ; } if (uname.length > 5 || uname.length < 2 ){ id_get_dom('error_msg' ).innerHTML = "用户名长度要在2~5之间" ; return ; } var upass = name_get_dom('upass' )[0 ].value; if (is_empty(upass)){ id_get_dom('error_msg' ).innerHTML = "密码不能为空" ; return ; } if (upass.length > 12 || upass.length < 6 ){ id_get_dom('error_msg' ).innerHTML = "密码长度要在6~12之间" ; return ; } if (upass.indexOf(uname) > 0 ){ id_get_dom('error_msg' ).innerHTML = "密码不能包含用户名" ; return ; } var sex = name_get_dom('sex' ); if (!sex[0 ].checked){ id_get_dom('error_msg' ).innerHTML = "性别必须为男" ; return ; } var ufav = name_get_dom('ufav' ); var len = 0 ; for (var u in ufav){ if (ufav[u].checked){ len += 1 ; break ; } } if (!len){ id_get_dom('error_msg' ).innerHTML = "爱好必须选中一项" ; return ; } var city = id_get_dom('city' ).value; if (city == -1 ){ id_get_dom('error_msg' ).innerHTML = "城市必须选中一项" ; return ; } id_get_dom('error_msg' ).innerHTML = "" ; id_get_dom('form1' ).submit(); } </script >
Jquery安装 下载安装
压缩版用于实际网站中,未压缩版用于测试和开发。本文中使用的是3.4.1版本,学习时建议把jquery脚本保存到本地后引用。 —> 更多官方版本 <—
安装
1 <script src ="xxx.js" > </script >
Jquery-3.5.1
1 <script src ="https://ajax.aspnetcdn.com/ajax/jquery/jquery-3.5.1.min.js" > </script >
1 <script src ="https://code.jquery.com/jquery-3.5.1.min.js" > </script >
1 https://code.jquery.com/jquery-3.5.1.js
Jquery3.4.1
1 <script src ="https://ajax.aspnetcdn.com/ajax/jquery/jquery-3.4.1.min.js" > </script >
1 <script src ="https://code.jquery.com/jquery-3.4.1.min.js" > </script >
1 https://code.jquery.com/jquery-3.4.1.js
Jquery3.3.1
1 <script src ="https://s3.pstatp.com/cdn/expire-1-M/jquery/3.3.1/jquery.min.js" > </script >
1 <script src ="https://ajax.aspnetcdn.com/ajax/jquery/jquery-3.3.1.min.js" > </script >
1 <script src ="https://code.jquery.com/jquery-3.3.1.min.js" > </script >
1 https://code.jquery.com/jquery-3.3.1.js
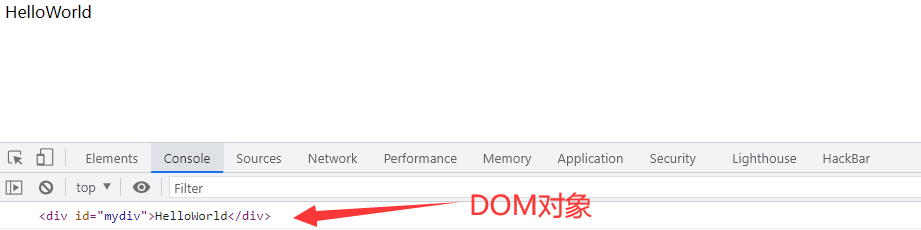
Jquery对象
通过js代码获取的对象都是DOM对象,而通过Jquery获取的对象是Jquery包装集对象,简称Jquery对象。只有Jquery对象才能引用Jquery提供的方法
Dom对象
1 2 3 4 5 6 7 8 <body > <div id ="mydiv" > HelloWorld</div > <script > var mydiv = document .getElementById('mydiv' ); console .log(mydiv); </script > </body >
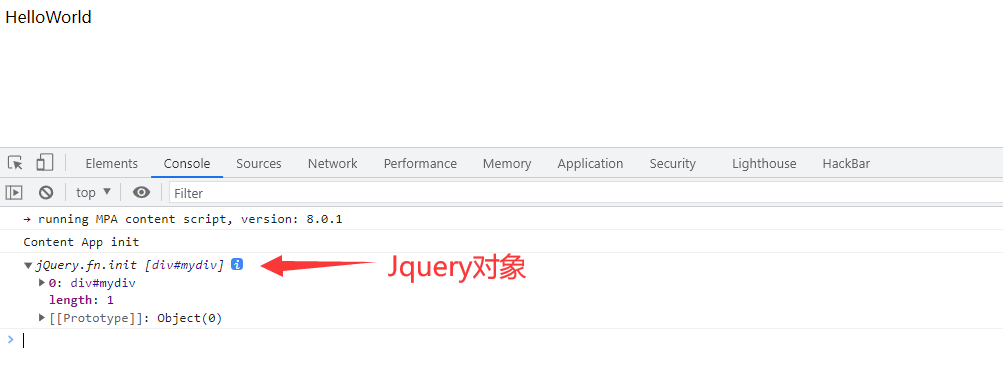
Jquery对象
通过Jquery获取的对象是Jquery包装集对象,简称Jquery对象
1 2 3 4 5 6 7 8 9 <body > <div id ="mydiv" > HelloWorld</div > <script src ="js/jquery-3.4.1.js" > </script > <script > var mydiv = $('#mydiv' ); console .log(mydiv); </script > </body >
对象转换 DOM对象转Jquery对象
1 2 3 var dom对象 = document .getElementById('mydiv' ); var jquery对象 = $(dom对象);
1 2 3 4 5 6 7 8 9 10 <body > <div id ="mydiv" > HelloWorld</div > <script src ="js/jquery-3.4.1.js" > </script > <script > var mydiv = document .getElementById('mydiv' ); mydiv = $(mydiv); console .log(mydiv); </script > </body >
Jquery对象转DOM对象
1 2 3 var jquery对象 = $('#元素id' );var dom对象 = jquery对象[索引];
1 2 3 4 5 6 7 8 9 <body > <div id ="mydiv" > HelloWorld</div > <script src ="js/jquery-3.4.1.js" > </script > <script > var mydiv = $('#mydiv' ); console .log(mydiv[0 ]); </script > </body >
Jquery选择器 基础选择器 选择器
选择器
语法
id选择器
#元素id
元素名选择器
元素名
类选择器
.class属性值
通用选择器
*
组合选择器
选择器1,选择器2,选择器3
代码示例
1 2 3 4 5 6 7 8 9 10 11 12 13 14 15 16 17 18 19 20 21 22 23 24 25 26 27 28 <body > <div id ="mydiv1" > id选择器</div > <span > 元素选择器</span > <div id ="mydiv1" class ="mydiv2" > 类选择器</div > <script src ="js/jquery-3.4.1.js" > </script > <script > var div1 = $('#mydiv1' ); console .log(div1); var div2 = $('.mydiv2' ); console .log(div2); var span1 = $('span' ); console .log(span1); var all_div = $('#mydiv1, .mydiv2' ); console .log(all_div); var all = $('*' ); console .log(all); </script > </body >
层次选择器 选择器
选择器
语法
描述
后代选择器
父元素 指定元素选择父元素的所有指定元素
子代选择器
父元素>指定元素选择父元素的所有第一代指定元素
相邻选择器
元素+指定元素选择元素的下一个指定元素(只有一个)
同辈选择器
元素~指定元素选择元素的所有指定元素
代码示例
1 2 3 4 5 6 7 8 9 10 11 12 13 14 15 16 17 18 19 20 21 22 23 24 25 26 27 28 29 30 31 <body > <div id ="div1" > div1 <div id ="div2" > div2 <div class ="div3" > div3</div > <span > span1</span > <span > span2</span > </div > <div > div4 <div > div5</div > </div > </div > <script src ="js/jquery-3.4.1.js" > </script > <script > console .log($('#div1 div' )); console .log($('#div1 > div' )); console .log($('.div3 + span' )); console .log($('.div3 ~ span' )); </script >
表单选择器 选择器
选择器
语法
表单选择器
:input
文本框选择器
:text
密码框选择器
:password
单选框选择器
:radio
复选框选择器
:checkbox
提交按钮选择器
:submit
图像域选择器
:image
重置按钮选择器
:reset
按钮选择器
:button
文件域选择器
:file
代码示例
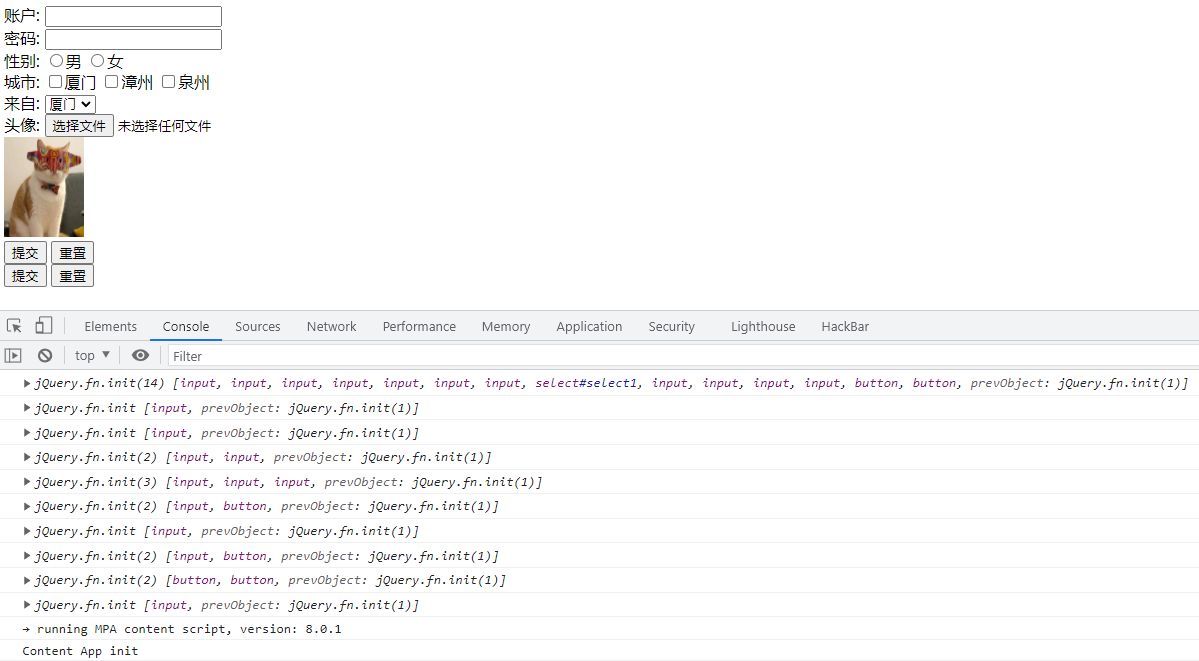
1 2 3 4 5 6 7 8 9 10 11 12 13 14 15 16 17 18 19 20 21 22 23 24 25 26 27 28 29 30 31 32 33 34 35 36 37 38 39 40 41 42 43 44 45 46 47 48 49 50 51 52 53 54 55 56 57 58 59 60 61 62 63 64 <body > <form action ="" id ="form1" > 账户: <input type ="text" name ="uname" > <br > 密码: <input type ="password" name ="upass" > <br > 性别: <input type ="radio" name ="sex" value ="1" > 男 <input type ="radio" name ="sex" value ="0" > 女<br > 城市: <input type ="checkbox" name ="city" value ="厦门" > 厦门 <input type ="checkbox" name ="city" value ="漳州" > 漳州 <input type ="checkbox" name ="city" value ="泉州" > 泉州<br > 来自: <select name ="select1" id ="select1" > <option value ="厦门" > 厦门</option > <option value ="漳州" > 漳州</option > <option value ="泉州" > 泉州</option > </select > <br > 头像: <input type ="file" > <br > <input type ="image" src ="src/1.jpg" width ="80px" height ="100px" > <br > <input type ="submit" value ="提交" > <input type ="reset" value ="重置" > <br > <button type ="submit" > 提交</button > <button type ="reset" > 重置</button > </form > <script src ="js/jquery-3.4.1.js" > </script > <script > console .log($(':input' )); console .log($(':text' )); console .log($(':password' )); console .log($(':radio' )); console .log($(':checkbox' )); console .log($(':submit' )); console .log($(':image' )); console .log($(':reset' )); console .log($(':button' )); console .log($(':file' )); </script > </body >
Jquery-DOM操作 操作元素属性 获取属性
attr()方法获取返回值为布尔属性时,选中返回checked,没选中返回undefined
prop()方法获取返回值为布尔属性时,选中返回true,没选中返回false
prop()方法获取自定义属性时返回undefined
方法
描述
attr(属性名)
获取指定的属性值
prop(属性名)
获取具有true、false两个属性的值
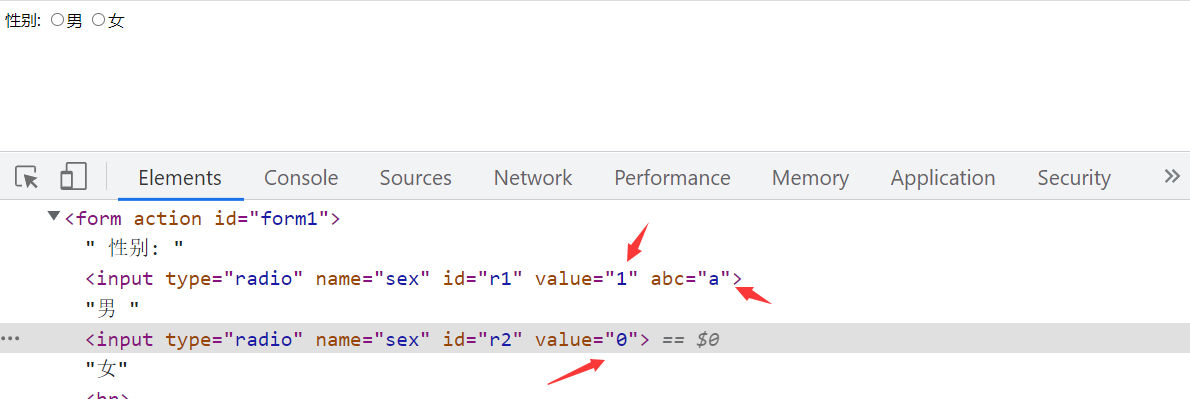
1 2 3 4 5 6 7 8 9 10 11 12 13 14 15 16 17 18 19 <body > <form action ="" id ="form1" > 性别: <input type ="radio" name ="sex" value ="1" checked ="checked" > 男 <input type ="radio" name ="sex" value ="0" > 女<br > </form > <script src ="js/jquery-3.4.1.js" > </script > <script > console .log($(':radio' ).attr('name' )); console .log($(':radio' ).prop('name' )); console .log($(':radio' ).attr('checked' )); console .log($(':radio' ).prop('checked' )); </script > </body >
设置属性
1 2 3 attr(属性名, 值); prop(属性名, 值);
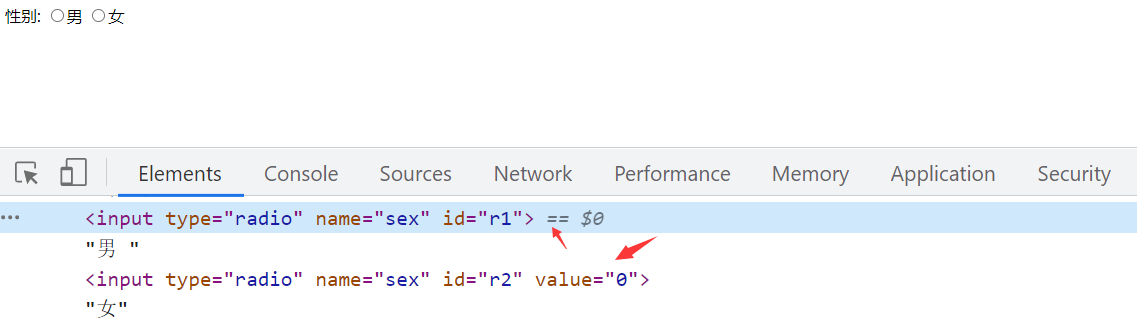
1 2 3 4 5 6 7 8 9 10 11 12 13 14 15 16 17 18 19 <body > <form action ="" id ="form1" > 性别: <input type ="radio" name ="sex" id ="r1" > 男 <input type ="radio" name ="sex" id ="r2" > 女<br > </form > <script src ="js/jquery-3.4.1.js" > </script > <script > $('#r1' ).attr('value' , '1' ); $('#r2' ).prop('value' , '0' ); $('#r1' ).attr('abc' , 'a' ); $('#r2' ).prop('abc' , 'b' ); </script > </body >
移除属性
方法
描述
removeAttr(‘属性名’)
移除元素属性
1 2 3 4 5 6 7 8 9 10 11 12 13 14 <body > <form action ="" id ="form1" > 性别: <input type ="radio" name ="sex" id ="r1" value ="1" > 男 <input type ="radio" name ="sex" id ="r2" value ="0" > 女<br > </form > <script src ="js/jquery-3.4.1.js" > </script > <script > $('#r1' ).removeAttr('value' ); </script > </body >
操作元素样式
方法
描述
attr(‘class’)
获取元素class属性值 (样式名)
attr(‘class’, ‘值’)
设置元素class属性值 (样式名)
addClass(‘值’)
添加样式
css(‘样式名’,’值’)
添加具体样式
removeClass(‘class’)
移除样式名
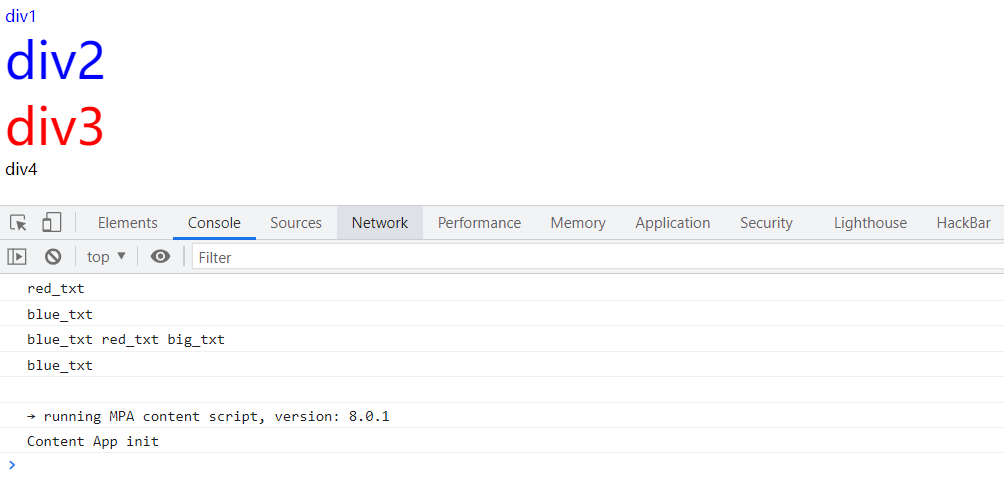
1 2 3 4 5 6 7 8 9 10 11 12 13 14 15 16 17 18 19 20 21 22 23 24 25 26 27 28 29 30 31 32 33 34 35 36 37 38 39 40 41 42 43 44 45 46 47 48 49 50 51 52 53 54 55 56 <head > <meta charset ="utf-8" /> <title > JQuery</title > <style > .red_txt { color : red; } .blue_txt { color : blue; } .big_txt { font-size : 50px ; } </style > </head > <body > <div id ="div1" class ="red_txt" > div1</div > <div id ="div2" > div2</div > <div id ="div3" > div3</div > <div id ="div4" class ="red_txt" > div4</div > <script src ="js/jquery-3.4.1.js" > </script > <script > console .log($('#div1' ).attr('class' )); $('#div1' ).attr('class' , 'blue_txt' ); console .log($('#div1' ).attr('class' )); $('#div2' ).addClass('blue_txt' ); $('#div2' ).addClass('red_txt' ); $('#div2' ).addClass('big_txt' ); console .log($('#div2' ).attr('class' )); $('#div3' ).css({ 'color' :'red' , 'font-size' :'50px' }); $('#div3' ).addClass('blue_txt' ); console .log($('#div3' ).attr('class' )); $('#div4' ).removeClass(); console .log($('#div4' ).attr('class' )) </script > </body >
操作元素内容
html()、text()方法针对非表单元素,val()方法针对表单元素
方法
描述
html()
获取元素的html内容
html(‘html, 内容’)
设置元素的html内容
text()
获取元素的文本内容,不包含html
text(‘text值’)
设置元素的文本内容,不包含html
val()
获取元素的value值
val(‘值’)
设置元素的value值
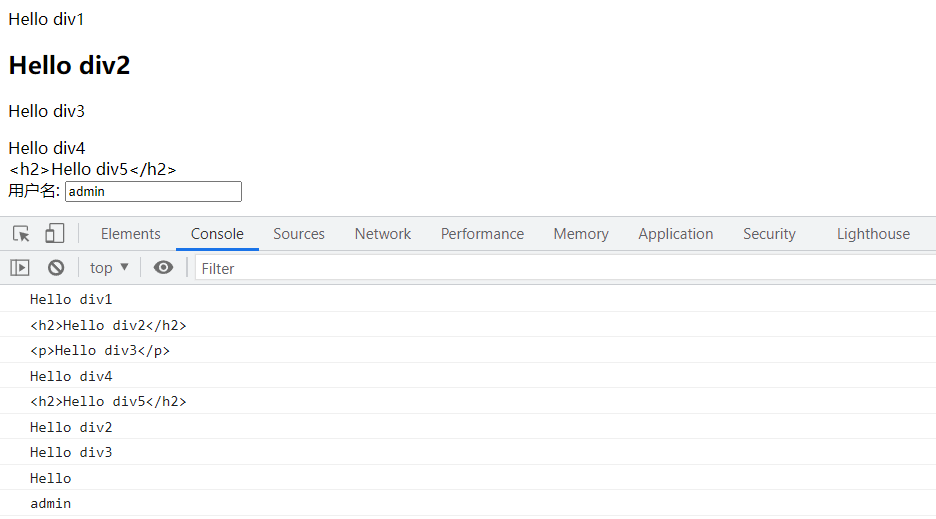
1 2 3 4 5 6 7 8 9 10 11 12 13 14 15 16 17 18 19 20 21 22 23 24 25 26 27 28 29 30 31 32 33 34 35 36 37 38 39 40 <body > <div id ="div1" > </div > <div id ="div2" > </div > <div id ="div3" > <p > Hello div3</p > </div > <div id ="div4" > </div > <div id ="div5" > </div > 用户名: <input type ="text" id ="uname" name ="uname" value ="Hello" > <script src ="js/jquery-3.4.1.js" > </script > <script > $('#div1' ).html('Hello div1' ); $('#div2' ).html('<h2>Hello div2</h2>' ); console .log($('#div1' ).html()); console .log($('#div2' ).html()); console .log($('#div3' ).html()); $('#div4' ).text('Hello div4' ); $('#div5' ).text('<h2>Hello div5</h2>' ); console .log($('#div4' ).text()); console .log($('#div5' ).text()); console .log($('#div2' ).text()); console .log($('#div3' ).text()); console .log($('#uname' ).val()); $('#uname' ).val('admin' ); console .log($('#uname' ).val()); </script > </body >
添加元素
插入的内容可以是字符或HTML元素
可以将内容替换为已经存在的元素,将该元素移动到指定位置
方法
描述
prepend(内容)
在被选元素内部开头插入内容 (子元素)
$(内容).prependTo(选择器)
将内容加入到选择器元素开头 (子元素)
append(内容)
在被选元素内部的尾部插入内容 (子元素)
$(内容).appendTo(选择器)
把内容插入到选择器元素内,默认在尾部 (子元素)
before()
在元素前插入指定内容 (同级元素)
after()
在元素后插入指定内容 (同级元素)
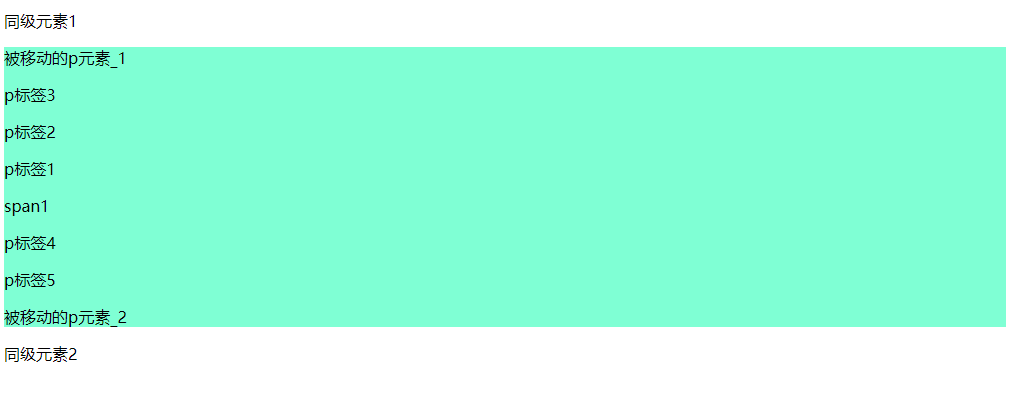
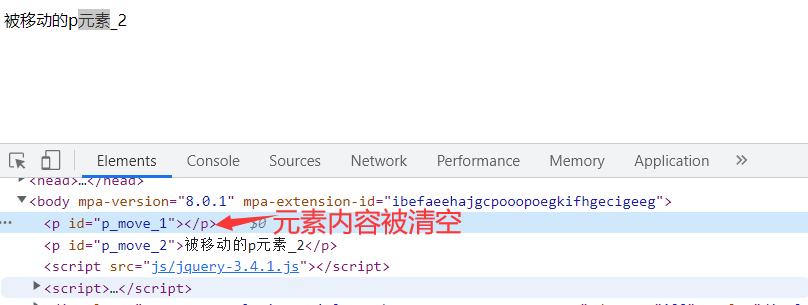
1 2 3 4 5 6 7 8 9 10 11 12 13 14 15 16 17 18 19 20 21 22 23 24 25 26 27 28 29 <body > <p id ="p_move_1" > 被移动的p元素_1</p > <p id ="p_move_2" > 被移动的p元素_2</p > <div id ="div1" style ="background-color: aquamarine;" > <span > span1</span > </div > <script src ="js/jquery-3.4.1.js" > </script > <script > $('#div1' ).prepend($('<p>p标签1</p>' )); $('#div1' ).prepend('<p>p标签2</p>' ); $('<p>p标签3</p>' ).prependTo($('#div1' )); $('#div1' ).prepend($('#p_move_1' )); $('#div1' ).append('<p>p标签4</p>' ); $('<p>p标签5</p>' ).appendTo($('#div1' )) $('#div1' ).append($('#p_move_2' )); $('#div1' ).before('<p>同级元素1</p>' ); $('#div1' ).after('<p>同级元素2</p>' ); </script > </body >
删除元素
方法
描述
remove()
删除所选元素,包括内容与标签
empty()
清空所选元素的内容
1 2 3 4 5 6 7 8 9 10 11 12 13 14 15 16 17 <body > <p id ="p_move_1" > 被移动的p元素_1</p > <p id ="p_move_2" > 被移动的p元素_2</p > <div id ="div1" style ="background-color: aquamarine;" > <span > span1</span > </div > <script src ="js/jquery-3.4.1.js" > </script > <script > $('#div1' ).remove(); $('#p_move_1' ).empty(); </script > </body >
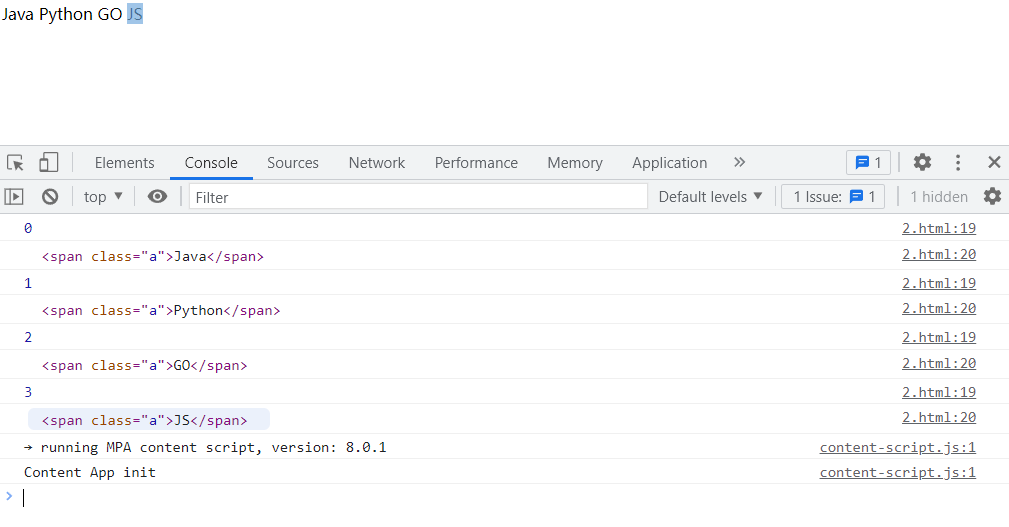
遍历元素 语法
1 $(选择器).each(function (索引, DOM元素 )
代码示例
有时候遍历出来的结果显示是span.a,可以刷新或换个浏览器再尝试
1 2 3 4 5 6 7 8 9 10 11 12 13 14 15 16 17 <body > <span class ="a" > Java</span > <span class ="a" > Python</span > <span class ="a" > GO</span > <span class ="a" > JS</span > <script src ="js/jquery-3.4.1.js" > </script > <script > $('.a' ).each(function (index, dom ) console .log(index); console .log(dom); }); </script > </body >
Jquery事件 加载事件
类似于JS中的onLoad()事件,等待某个元素或整个页面加载完成后再执行代码
1 2 3 4 5 6 7 8 9 $(元素).ready(function ( 元素加载完成后执行的代码; }); $(function ( 元素加载完成后执行的代码; });
代码示例
如果没有预加载则JS会先获取元素的值,这时候元素还没加载出来,所以获取不到
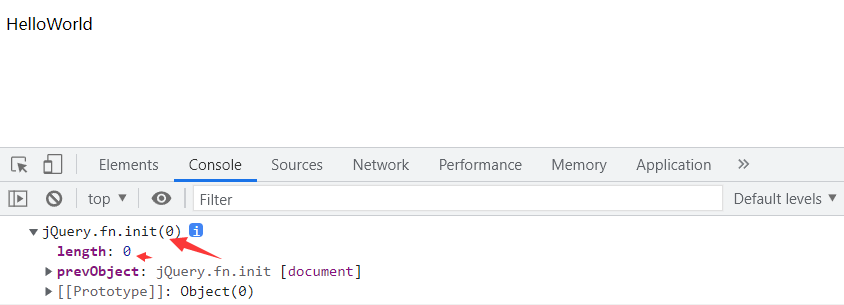
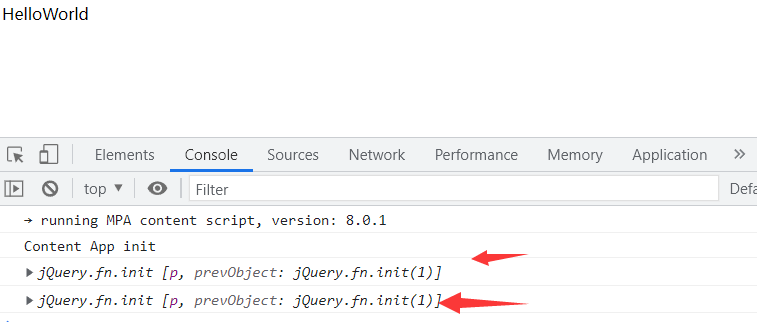
1 2 3 4 5 6 7 8 9 10 11 12 13 14 <head > <meta charset ="utf-8" /> <title > JQuery-预加载</title > <script src ="js/jquery-3.4.1.js" > </script > <script > console .log($('p' )); </script > </head > <body > <p > HelloWorld</p > </body >
1 2 3 4 5 6 7 8 9 10 11 12 13 14 15 16 17 18 19 20 <head > <meta charset ="utf-8" /> <title > JQuery-预加载</title > <script src ="js/jquery-3.4.1.js" > </script > <script > $(document ).ready(function ( console .log($('p' )); }); $(function ( console .log($('p' )); }); </script > </head > <body > <p > HelloWorld</p > </body >
绑定事件 语法
1 2 3 4 5 6 7 8 9 10 11 12 13 $(元素).bind("事件类型" , 绑定的函数); $(元素).bind("事件类型1 事件类型2" , 绑定的函数); $(元素).bind("事件类型1" , 绑定的函数).bind("事件类型2" , 绑定的函数); $(元素).bind({ "事件类型1" : 绑定函数, "事件类型2" : 绑定函数 }); $(元素).事件类型(绑定的函数); $(元素).事件类型1 (绑定的函数).事件类型2 (绑定的函数);
单个事件示例
1 2 3 4 5 6 7 8 9 10 11 12 13 14 15 16 17 18 19 20 21 22 23 24 25 <body > <p id ="p1" > HelloWorld</p > <button type ="button" id ="btn1" > 按钮1</button > <button type ="button" id ="btn2" > 按钮2</button > <button type ="button" id ="btn3" > 按钮3</button > <script src ="js/jquery-3.4.1.js" > </script > <script > $('#btn1' ).bind('click' , function ( $('#p1' ).text("按钮1被点击了" ); }); $('#btn2' ).click(function ( $('#p1' ).text("按钮2被点击了" ); }); document .getElementById('btn3' ).onclick = function ( document .getElementById('p1' ).innerHTML = "按钮3被点击了" ; } </script > </body >
多个事件
1 2 3 4 5 6 7 8 9 10 11 12 13 14 15 16 17 18 19 20 21 22 23 24 25 26 27 28 29 30 31 32 33 34 35 36 37 38 39 40 <body > <p id ="p1" > HelloWorld</p > <button type ="button" id ="btn1" > 按钮1</button > <button type ="button" id ="btn2" > 按钮2</button > <button type ="button" id ="btn3" > 按钮3</button > <button type ="button" id ="btn4" > 按钮4</button > <script src ="js/jquery-3.4.1.js" > </script > <script > $('#btn1' ).bind('click mouseout' , function ( $('#p1' ).text("按钮1被触发了" ); }); $('#btn2' ).bind('click' , function ( $('#p1' ).text("按钮2被点击了" ); }).bind('mouseout' , function ( $('#p1' ).text("按钮2被触发了" ); }) $('#btn3' ).bind({ 'click' : function ( $('#p1' ).text("按钮3被点击了" ); }, 'mouseout' : function ( $('#p1' ).text("按钮3被触发了" ); }, }) $('#btn4' ).click(function ( $('#p1' ).text("按钮4被点击了" ); }).mouseout(function ( $('#p1' ).text("按钮4被触发了" ); }); </script > </body >
Jquery-Ajax
异步无刷新技术,无需等待服务器返回结果还可以继续做事
.ajax方法 参数
参数
描述
type
请求方式(GET/POST)
url
请求地址
async
是否异步,默认true
data
发送的数据
dataType
预期服务器返回的数据类型
contentType
设置请求头
success
请求成功时调用的函数
error
请求失败时调用的函数
1 2 3 4 5 6 7 8 9 10 11 12 13 14 15 16 $.ajax({ type : "请求方式" , url : "请求地址" , data :{ "参数" : "值" , "参数" : "值" }, dataType : "预期返回数据类型" , success : function (data ) }, error : function ( } });
代码示例
js/data.txt文件内容
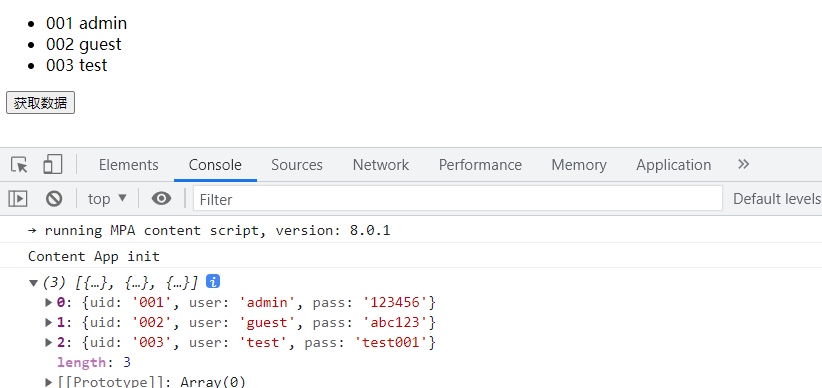
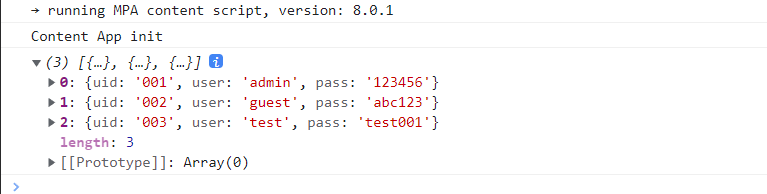
1 2 3 4 5 6 7 8 9 10 11 12 13 14 15 16 17 [ { "uid" : "001" , "user" : "admin" , "pass" : "123456" }, { "uid" : "002" , "user" : "guest" , "pass" : "abc123" }, { "uid" : "003" , "user" : "test" , "pass" : "test001" } ]
1 2 3 4 5 6 7 8 9 10 11 12 13 14 15 16 17 18 19 20 21 22 23 24 25 26 27 28 29 30 31 32 33 34 35 36 <body > <div id ="div1" > </div > <button type ="button" id ="btn" > 获取数据</button > <script src ="js/jquery-3.4.1.js" > </script > <script > $('#btn' ).click(function ( $.ajax({ type : "get" , url : "js/data.txt" , dataType : "json" , success : function (data ) console .log(data); var ul = $('<ul></ul>' ); for (var i in data){ var uid = data[i]['uid' ]; var user = data[i]['user' ]; var pass = data[i]['pass' ]; var li = "<li>" + uid + " " + user + "</li>" ; ul.append(li); } $('#div1' ).append(ul); }, error : function ( console .log("请求失败" ); } }); }); </script > </body >
.get方法
这是一个比$.ajax()简单的GET请求功能,该方法不能调用请求错误时执行回调函数
如果返回的结果为json格式但不是json对象,则需要对其进行返序列化操作
发送get请求
请求且传参
1 2 3 4 5 $.get('请求地址' , { '参数' :'值' , '参数' :'值' });
请求且获取返回值
1 2 3 $.get('请求地址' , function (data ) });
请求传参且获取返回值
1 2 3 4 5 6 $.get('请求地址' , { '参数' :'值' , '参数' :'值' }, function (data ) });
1 2 3 4 5 6 7 8 9 10 11 12 13 14 <body > <button type ="button" id ="btn" > 获取数据</button > <script src ="js/jquery-3.4.1.js" > </script > <script > $('#btn' ).click(function ( $.get('js/data.txt' , function (data ) var json_data = JSON .parse(data); console .log(json_data); }); }); </script > </body >
.post方法
$.post()方法与$.get()方法一样,将关键词get换成post即可
1 $.post('请求地址' , '请求数据' , 请求成功执行的函数);
.getJSON方法
该方法与$.get()方法一样,将关键词get换成post即可
该方法返回的数据格式一定要是JSON格式数据或JSON对象,否则无法获取数据
该方法会自动将返回的JSON格式数据反序列化为JSON对象
1 $.getJSON('请求地址' , '请求数据' , 请求成功执行的函数);
1 2 3 4 5 6 7 8 9 10 11 12 <body > <button type ="button" id ="btn" > 获取数据</button > <script src ="js/jquery-3.4.1.js" > </script > <script > $('#btn' ).click(function ( $.getJSON('js/data.txt' , function (data ) console .log(data); }); }); </script > </body >


 wechat
 alipay